Search This Blog

Monday 31 July 2017

5). Moving Files From FolderA(In) To FolderB(Out) just by using BizTalk Admin Console(Visual Studio is not required for this)

Open Run Command and type “BTSMMCLauncher.exe” to Open BizTalk Admin Console or you can open from installed programs.
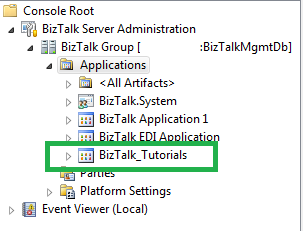
Expand BizTalk Server Administration Tree nodeà Expand BizTalk Group NodeàExpand Applications Node
We should see the application (BizTalk_Tutorials) that we have deployed in the previous article in the application list.
Expand BizTalk_Tutorials application node and you should see all the artefact nodes.

Creating Receive Port, Receive Location and configure FILE Receive Location:-

Receive Port: - Receive Port is a Logical container of one or more receive locations. Receive location is the physical one that really connects to the external system. When the Receive location

Right click on Receive Ports node à Newà One-Way Receive Port
In the Name Textbox give the name to Receive Port as rcv_PurchaseOrders

Note: - We are creating this receive port to receive files from a folder location. The location can be on the Server where BizTalk is installed or the network share location.

Click on Receive Locations Tab on Receive Ports window.
Click on New Button to create a new receive location and in the Name Textbox of Receive location (RL) window give the name as rcv_FILE_PurchaseOrders.
In the Type Dropdown select FILE and Click the Configure Button to Configure our receive location.
In the Receive Folder textbox we need to enter the folder location where we will be receiving the files from. In our Example I have I have following location C:\Tutorials\In\

File Mask: - This is very important filed that we need to configure on RL. It we only want to process files with certain file extension then we specify here.  
Example: - If we want to process only xml files then the mask is *.xml
If we want to process only csv files then the mask is *.csv
If we want to process all types of files then the file mask is *.*
In My example I am dealing with .txt files so I am using *.txt in File Mask.

We are done with Receive Port and Receive Location configuration.

Creating Send port and configuring:-

Send Port (SP): - Send Port is the responsible artifact to subscribe to the messages that are been published to Message Box by the Receive Port. SP subscribes to the messages by using something called SP Filters.  The most commonly used Filters are BTS.MessageType, BTS.ReceivePortName.

RC on Send PortsàNewàStatic One-Way Send Portà
Name the SP as snd_PurchaseOrders à Select FILE in the Transport Type drop downà Click on Configure Buttonà

In the FILE Transport Properties window that opensà set the Destination Folder to C:\Tutorials\Out\ and the File name to %SourceFileName% 

Click on Filters tabà  in the middle of the screen click underneath the Property column and add the BTS.ReceivePortName Context Property and in the value field add the Name of the Receive Port that we have created which is rcv_PurchaseOrders


Note: - By creating filter on Send port we have created subscription on send port. By adding this filter, what we telling send port is that, All the messages that are been published from rcv_PurchaseOrders receive port are subscribed by the snd_PurchaseOrders send port. And sent to the destination folder (C:\Tutorials\Out\) configured on Send port.

Now if you drop any .txt files in the input(C:\Tutorials\In\) folder then the files should appear in the output(C:\Tutorials\Out\) folder.

I know if you have followed just all the steps that i have discussed the files will still be there in the input location. The reason for this is the Receive Location, Send Port are not started yet. Once you start them in right sequence then the files wll be moved to output folder.

Note:- First we need to start Send Ports then only receive ports the reason being, if you start the receive location first; BizTalk can't find the active subscribers at that point in time so it will suspend the messages with the below error.

The published message could not be routed because no subscribers were found. This error occurs if the subscribing orchestration or send port has not been enlisted, or if some of the message properties necessary for subscription evaluation have not been promoted. Please use the Biztalk Administration console to troubleshoot this failure. 

Acronyms used in the article:-

(RC): Right Click
(RL): Receive location
(SP):  Send Port

Monday 24 July 2017

4).Deployment of BizTalk Solutions (Projects) to local BizTalk Admin Console

In this article we shall be discussing how to deploy the BizTalk solution (Collection of Projects) to the BTS Admin Console.

BizTalk Deployments are not that complicated as people think in most of the BizTalk environments.
We will be deploying the solution (that consists of 4 projects) that we have created in the previous article). We haven't created any artifacts in the projects yet but deployment process remains same with or without artifacts.

Visual Studio out of the Box gives us ability to deploy the BizTalk Solutions with very easy steps.

Step1:-Make sure solution (or the selected projects that you want to deploy) builds with no errors.

Right Click on the Solution à Build Solution:  as shown below

Once the Build is successful you will see the success message as shown below.

What does Build Solution Do behind the scenes?
If you come from .NET background you might already know what Building a solution results into.
But for non - .NET buddies below is my explanation what it means by building a solution.

In Visual Studio world below is the application structure that we see

  • We create a solution first (This is the top level place holder of any application that we write).
  • Each solution can have 1 or more Projects(BizTalk Projects, C# class libraries, etc.).
  • Each Project can have 1 or more artifacts (such as Schemas, Maps, Orchestration and Pipelines, etc.)
When we build the whole solution, Visual Studio Compiles all the projects in the Solution and creates some files called dll’s (Dynamics Link Library's). If there are any syntactical errors in any artifact then VS will show us with relevant errors.

Compilation is the process of converting the Source code that we write into Computer (.NET Runtime) understandable format. In BizTalk and .NET world the computer understandable format is MSIL (Microsoft Intermediate Language). Please not be worried if you don’t understand what compilation is and how it works. VS does it all for us when we Build the solution.

Each project in the solution results into a DLL after build is successful. If we have 10 projects in the solution then after build is successful it results into 10 DLL’s.

Step2:- Make sure all the projects in the solution have the Application Name and they are Signing is done as mentioned in the previous article from the properties window of the project.

Step3:- Deploy the solution
Right Click on Solution à Deploy Solution: as shown below.

Once the deployment is successful it will show the success message in output window as shown below.

Verifying the deployment is successful:-
After successful installation and configuration of BTS, we get BizTalk Admin Console Tool to manage BizTalk applications.

Open the BTS admin Console as shown below.
Once you open BTS shows the following window. This is one of the windows that we will mostly be working on in the rest of the tutorials.
Expand àBizTalk Server Administration à BizTalk Group àApplications

You should find our BizTalk_Tutorials Application as shown below.
Extapnd our BizTalk_Tutorials and navigate to Resources then you should see the following screen. The below screen confirms that the application has been successfully deployed to BizTalk Admin Console.


Congratulations you have deployed your first BizTalk application.

Note: - We will see the advanced and complex deployments, Exporting, Importing MSI and binding files and some more complex scenarios in near future articles.

Acronyms used in the article:-

VS: - Visual Studio
BTS:- BizTalk Server


If you have any questions or need more clarity on anything discussed in the article please feel free to comment below.

Friday 21 July 2017

3).Creating BizTalk Solution and project structure in Visual Studio

After successful installation of MS SQL Server 2014, Visual Studio 2013 and BizTalk Server 2013R2

Open Visual Studio 2013à Click on New Project à BizTalk Projects templateàEmpty BizTalk Server Project and name is BizTalk_Tutorials as shown below.
Once the Project got created the Solution looks as shown below.

Right Click on BizTalk_Tutorials Project and remove the project as shown below.

Go to the folder where we have created the solution and delete the BizTalk_Tutorials project as shown below.
We want to maintain the clean and real world project structure that is the reason why we have deleted the default project that got created.
Below steps adds the new project to the solution.
Right click on Solution à Addà New Project
BizTalk Projects templateàEmpty BizTalk Server Project and name is BizTalk_Tutorials.Schemas as shown below.

Add the Schemas, Maps, Orchestrations, Pipelines projects to the solution by following the instructions that we followed in creating BizTalk_Tutorials.Schemas project above. Once you have created all the projects the solution looks as shown below.
In Order for us to deploy the BizTalk Applications; we need to sign the assemblies. Signing the assemblies is done using Strong-Name key file. We don’t need to know much details about what and SNK file does internally.
A strong name guarantees the uniqueness of the assembly by assigning a digital signature and a unique key pair.

We can use the same SNK file for all the projects. In my BizTalk experience I've worked for multiple Clients and most of them use a single SNK File across all the BizTalk solutions(In in all the QA, Performance, Pre-Prod and Production environments).

Creating Strong Name Key:-

Right click on ProjectàPropertiesà Signing Tab
Check the CheckBox as shown below, create the new SNK file if you don’t have one already(This is most likely the case when you are creating the BizTalk project for the first time in your life).
If you already have the SNK file that is been created then click on Browse from below drop down and select the file from respective file location.
I have named the SNK file BizTalk_Tutorials but you can name as you wish.

Each project that we deploy to BizTalk Admin Console we need to have an application name. Here in this example it makes more sense to have the application name as BizTalk_Tutorials as shown below again the name is up to you.
Give the same Application Name to all the projects as we will be deploying all the projects into 1 application in BizTalk. Bear with me it will all make sense when we deploy the application to the BizTalk Admin console.

There are 3 important properties under deployment tab to be taken note of as highlighted above.
Restart Host Instances: - As a safety measure I personally enable Restart Host Instances to true. This restarts all the host instances associated with the application after the successful deployment from Visual Studio.
Enable Unit Testing: - In BizTalk we can unit test the schemas, maps and pipelines out of the Box. By enabling this option its lets us unit test the components. We will discuss more about this when we get to Unit Testing BizTalk in near future.

Just to make sure everything is good, let’s rebuild the solution as shown below.
If everything that we have done is good then we shall get the following output screen after rebuilding the solution.

Wednesday 12 July 2017

2).BizTalk Architecture

Understanding BTS architecture is very important for any one who would like to pursue their career on BTS either as a Developer or administrator.


Often the problems that we encounter in BizTalk can be solved by thinking architecturally. Nothing to worry if you don't understand the above line. We will come to this in near future.


BizTalk at high level it work on a principle called Publish-Subscribe(Pub-Sub) Architecture.

Before understanding Pub-Sub architecture we need to understand at least Receive and Send Ports.

Receive Ports(RP):- In BizTalk we connect to any external system using Receive ports. RP is a logical container that contains one of more Receive Locations. Receive port and Receive location both have names. Just remember that we will be using Receive Port Name on Send Port Filters to subscribe messages.

Receive location is the Physical thing, Receive Location is where we configure how we get the data(in BizTalk world it is called message) from external system.

On the Receive Location we have to configure following things to connect to external system.
1). Adapter:- Based on the Adapter that we select the configuration properties change.
Ex:- If we select FILE adapter, then we need to configure the file location.
If we select WCF-SQL Adapter then we need to configure SQL Connection string and the query that we need to execute
If we select MSMQ adapter then we need to select the server name and Queue Name and so on.
2).Pipeline:- There are 4 default pipelines that come out of the Box. 2 on receive side XMLReceive, PassThruReceive and 2 on send side, XMLTransmit, PassThruTransmit. We will talk more about the above mentioned default pipelines and building custom pipelines in detail in upcoming articles.


Pub-Sub Architecture:-
Publish(Pub):- At high-level when BizTalk Connects to any system and receive message it  saves(Persists) the message into its own Database called MessageBox(MessageBox is the SQL database gets created as part of the BizTalk installation and configuration). This process of saving message to the MessageBox is called Publishing technically speaking.

So in other words Receive Ports Publishes the messages to the MessageBox. So Receive port acts as a Publisher.

Subscription(Sub):- When the Message gets persisted in the MessageBox. Now we need to send the message to destination system(s). In order to send the messages to destination, BizTalk Send Ports retrieve the messages from MessageBox Based on the filters specified on Send Ports. This process of Send port retrieving the messages from the MessageBox is called Subscription.

By saying above we can conclude that send ports subscribe the message from MessageBox. So Send Port works as a subscriber.

Note:- When we configure receive and send ports accordingly the Publish and Subscription happens internally automatically. We don't write any code to persist the message to MessageBox.  If at all we need to insert the message to our own custom database for tracking purposes then, we need to configure another send port that inserts into SQL.

Below diagram explains the complete architecture of the BizTalk and we can make following observations from it.

  1. Receive Port has multiple Receive locations( We can have one or more receive locations on any given receive port).
  2. Receive Location has Adapter and Pipeline.
  3. We configure Maps on the Receive port level but not on receive location. Both receive and send ports can have 1 or more maps. and Maps are optional.
  4. After Receive Port components(adapter, pipeline and maps) are executed the XML message gets generated and gets published(saved) to the message box DB.
  5. Once the message is persisted(published) to the MessageBox DB, All the time send ports are listening to the MB for relevant messages. Once send port sees that MB has the message it is looking for then it reads(subscribes) to that message send it to the destination system by running Maps(if exists), pipeline and adapter.
  6. On the Other hand Orchestration can subscribe the messages from MB and execute some logic on the Message and publish the modified message back to the MB. Again the send port that is listening to the newly published message subscribes the message and send the message to destination.


So we can safely say that orchestrations works as both Publisher and Subscriber.


BizTalk Architecture image not available
BizTalk Architecture

If you don't understand what the adapters, pipelines, maps and orchestrations are please don't worry you will get proper understanding of what they are in near future with examples. For now if you understood how the architecture is then we are good to go.

1).Introduction to BizTalk Server(BTS)

BizTalk Server is software product from Microsoft which comes under Middleware platform. It allows any 2 or more systems connect and communicate with the help of something called Adapters

Adapters are the endpoints in BTS. 

There are wide verities of adapters that are available out of the box in BizTalk. There are also third party vendors that wrote the custom adapters that help BizTalk connect to the external systems where Microsoft doesn't have the adapter out of the box.

Throughout the article I will be using the names BizTalk Server, BTS, BizTalk interchangeably.

BTS has many Components but it very unlikely that everyone used everything on regular basis. Following are main concepts(Artifacts) that I will be covering here in this blog for now. I shall be adding the concepts going forward.

1).Schemas
2).Maps
3).Orchestrations
4).Pipelines
  • Receive Pipelines
  • Send Pipelines
5).Ports
  1. Receive Ports( Receive Locations )
  2. Send Ports
6).Send Port Groups

Sending Email to Multiple recipients using PowerShell

Hi All,  Below is the working code to Send emails to Multiple recipients using PowerShell. [STRING]$PSEmailServer = "YourSMTPServerIPOr...